 In this post, we will walk you through the process of updating the firmware of your MAG set-top box.
It lists the most common steps that you will need to manually update your MAG box with the latest software software updates for all the version of MAG boxes available in the market.
It is strongly advised that you use an ethernet network cable throughout this process to guarantee that your MAG box has an active internet connection at all times during upgrade.
Related Reads:
Connect one end of the ethernet network cable to the ethernet socket on the back of the MAG box and the other end to an available ethernet port on your internet router or cable modem.
This will provide a fast and steady internet connection during the flashing and firmware upgrading process, in which your box will attempt to flash and upgrade its firmware via a software auto-update.
A failed factory reset may occur if an ethernet cable is not used as wireless network are prone to be unstable and has high network drops.
Upgrade or Downgrade MAG Box Firmware through USB
The following steps will help you to upgrade or downgrade the software on your MAG box and make it completely new.
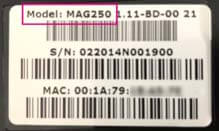
- First, locate the model number of your set-top box on the bottom of your MAG box.
- Next, using a PC or Mac (desktop or laptop computer), download the most recent firmware from one of the websites below:
- Copy the image to a USB memory stick formatted in FAT32 format.
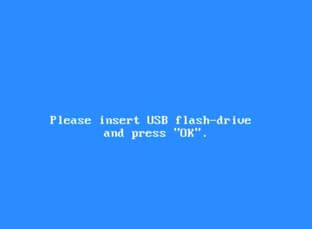
- Insert the USB memory stick into the MAG box’s USB port when it is turned off and the power cable is unplugged.
- After inserting the USB drive, plug the power wire into the rear socket at the back of the MAG box.
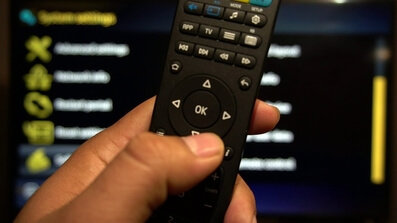
- Press and hold the MENU button on your remote while pointing at your MAG box. Do not release the button until you see the blue BIOS screen.
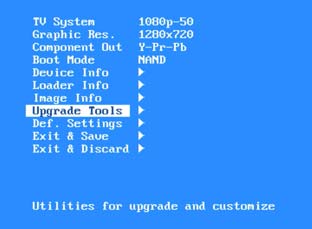
- Using the arrow keys on your remote, highlight “Upgrade Tools” and then push the right arrow on your remote.
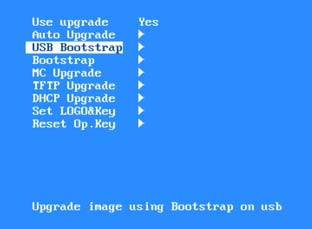
- Next, highlight “USB Bootstrap” and then use your remote to hit the right arrow key.
- Press the OK button on your remote when requested on-screen. Your MAG box will then look for the image file on your USB stick and begin the firmware upgrading procedure.
- After rebooting, the MAG box “inner portal” home screen should appear, with icons on a dark backdrop.
MAG250: https://update.infomir.com/mag/250/imageupdate
MAG254: https://update.infomir.com/mag/254/imageupdate
MAG256: https://update.infomir.com/mag/256/imageupdate
MAG322: https://update.infomir.com/mag/322/imageupdate
MAG324: https://update.infomir.com/mag/324/imageupdate
![]()
To enable the update to complete, follow all on-screen instructions. When finished, your MAG box will reboot automatically.
Important: At this moment, your MAG Box may perform a “Software Autoupdate.” Allow this to finish if it is. Do not turn off the power or interrupt the procedure.
You have now completed a factory reset on your MAG IPTV box and have updated the software on the device. Following that, you would setup your box to recognise your Canadian IPTV service.
***Update
Infomir has also provided the following steps that will allow you to quickly upgrade the software of your MAG box online, without going through the USB process. But, if you wish to downgrade the software on your MAG Box, you will need to follow the above USB process.
Online Software Upgrade MAG Box
Before we begin, we need the MAG box in the portal screen. To do so:
- To begin, make sure your TV is ON and that you can see your MAG box UI on screen.
- Remove the power cord from the back of the box and reinsert it to restart the box.
- Take the MAG box’s remote control and wait until the “Loading…” UI on your TV disappears.
- When you see a blank TV screen, press and hold the “Menu” button on the remote until the MAG box loads the “Portals” screen.
The “Portal” screen should now appear on your MAG box.
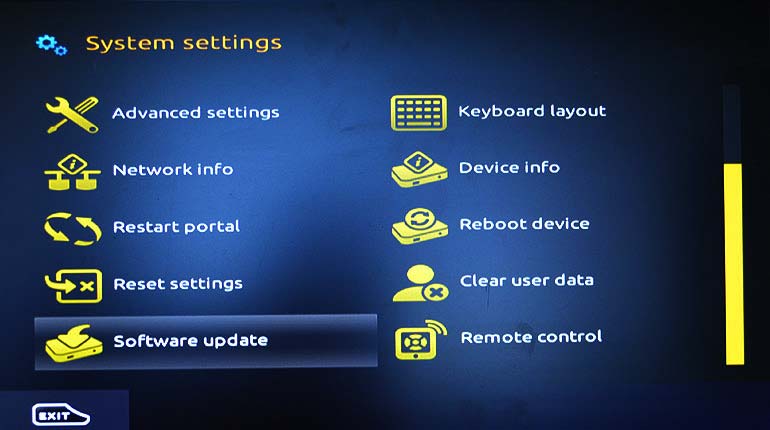
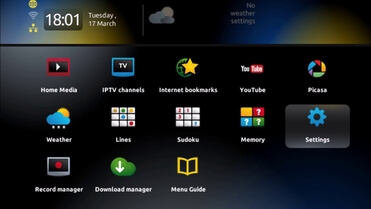
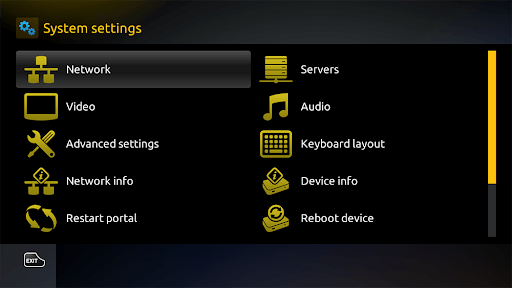
- Now, using your remote control, scroll to “System settings,” highlight it, and then press the “OK” button.
- Use your remote control to scroll down to the option “Software Update” at the bottom left of the next menu screen, highlight it, and then press “OK.”
- Now, using the direction keys on your remote, highlight the “URL” box and press the “OK” button.
- If you need to update the firmware on your MAG 254, press the red “F1” key on your remote, and the firmware upgrade will begin.
You should now see the software update page. Check that the “Update Method” column is set to “HTTP” and that the “URL” box is autocompleted. Keep in mind that if the URL field is empty, you must manually insert the following where
This will open a pop-up window with information about your MAG box’s current firmware version, description, and date. You can see whether there is a new firmware update available by looking at the on-screen details.
Be patient while the firmware update is being performed. During this operation, do not turn off, unplug, or disconnect your MAG box. Any disruptions during the firmware upgrade process may create serious problems with your box, rendering it inoperable.
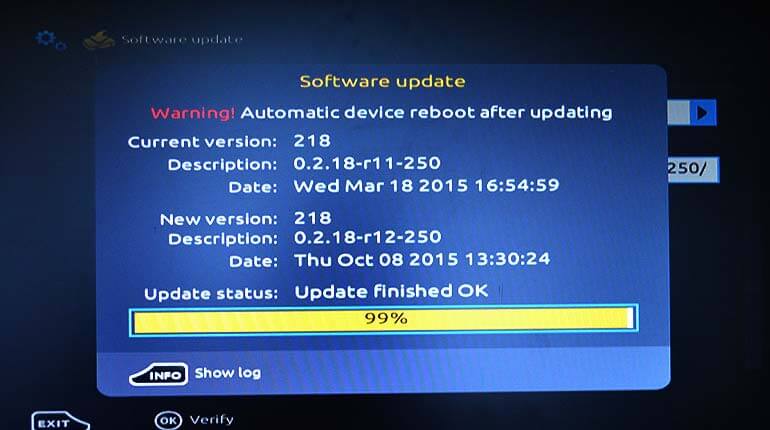
After that, when the MAG box’s firmware update is complete, the box will reboot automatically.
Configure the Time Server on MAG Box
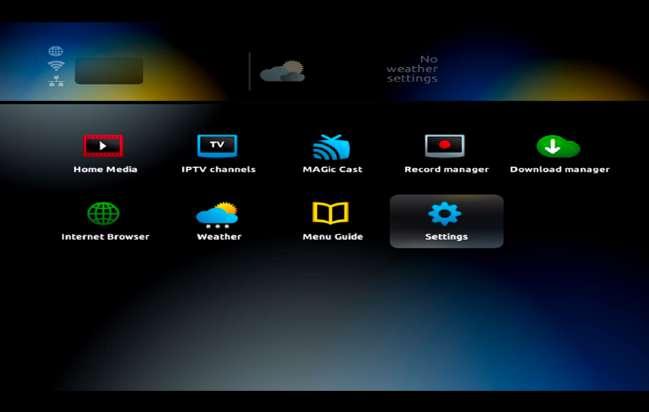
- From the home screen, use your remote to select Settings, then click OK.
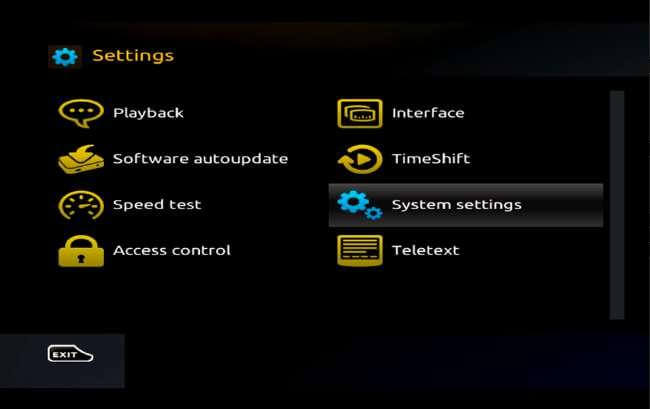
- On the following panel, highlight System Settings and click OK.
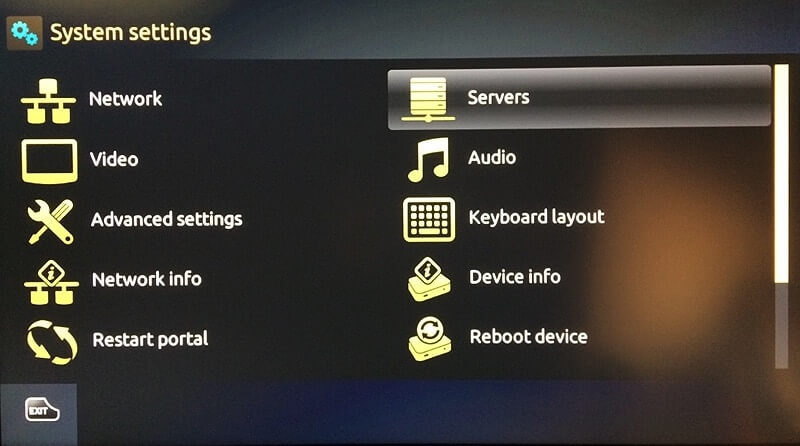
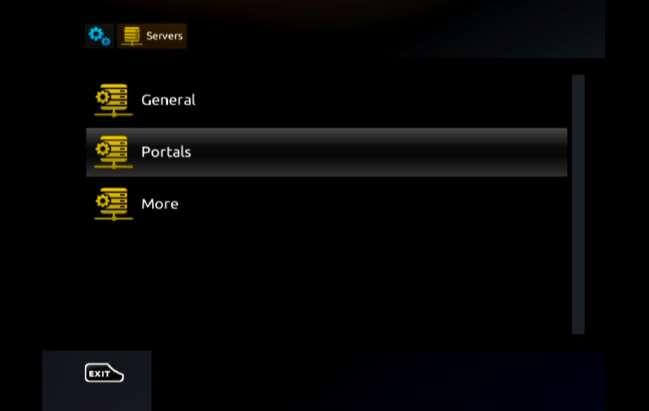
- Choose Servers and then click OK.
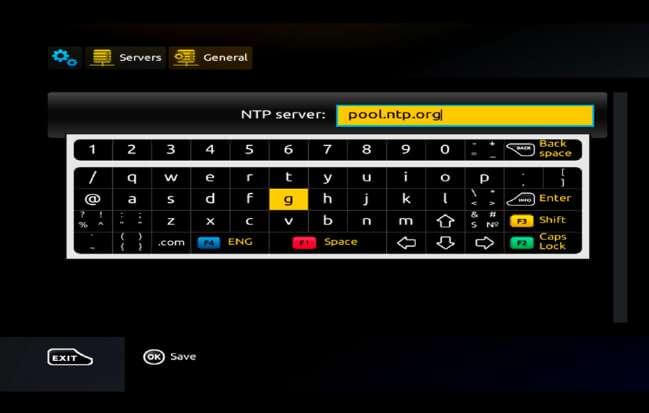
- Then, on your remote, highlight General and hit the OK button.
- On this screen, type pool.ntp.org into the NTP server text area.
- Now, on your remote, click the EXIT button twice to return to the System Settings option.
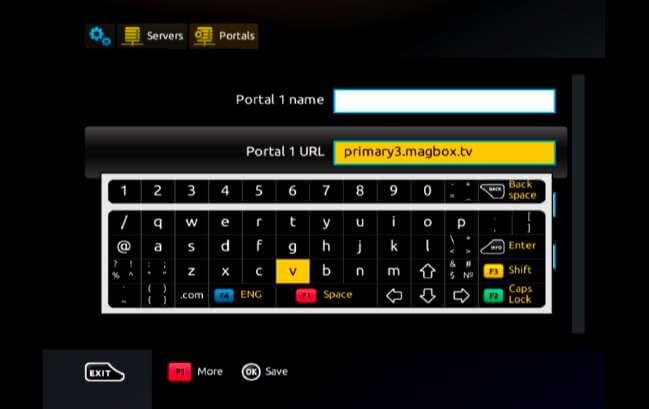
- Choose Portals and click OK.
- On the next page, highlight the Portal 1 URL text field and then use your remote to toggle the on-screen keyboard by pressing the KB (Keyboard) button.
- Then, using your remote, type in the portal URL of your provider.
- Once you’ve entered your details, press the KB (Keyboard) button again to close the on-screen keyboard. Then, on your remote, click OK to save your changes.
- Now, on your remote, click the EXIT button to switch to the System Settings option.
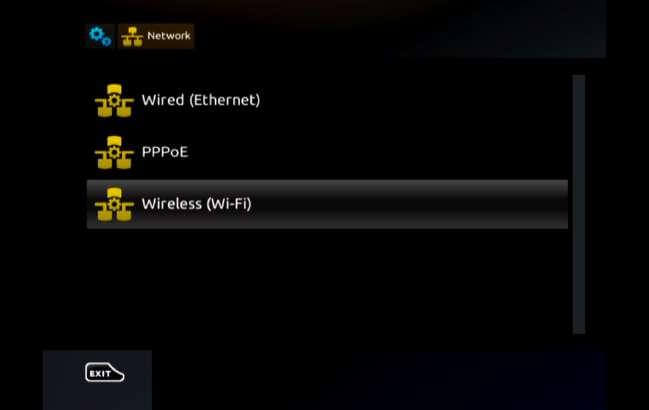
- If your MAG box connects to your home network via WiFi, you must first configure it. If your MAG box connects via Ethernet, reinsert the Ethernet cable at the back of the box and proceed to Step 27.
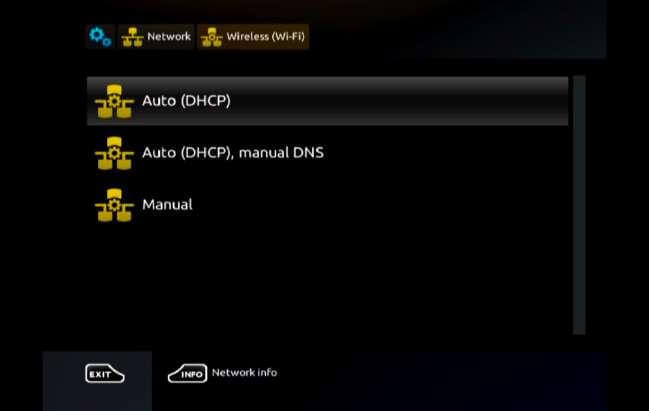
- Using your remote, highlight “Network” and click OK from the “System Settings” option.
- Using your remote, highlight Wireless (Wi-Fi) and click OK.
- Now, on your remote, choose “Auto (DHCP)” and click OK.
- On the following screen, you can see a list of available WiFi networks. Select the network you want to use and click OK.
- Using your remote, highlight the “Key or pass” text area, then click the KB (Keyboard) button to bring up the on-screen keyboard. Then, using your remote, type your WiFi network password, being careful to use proper case and special
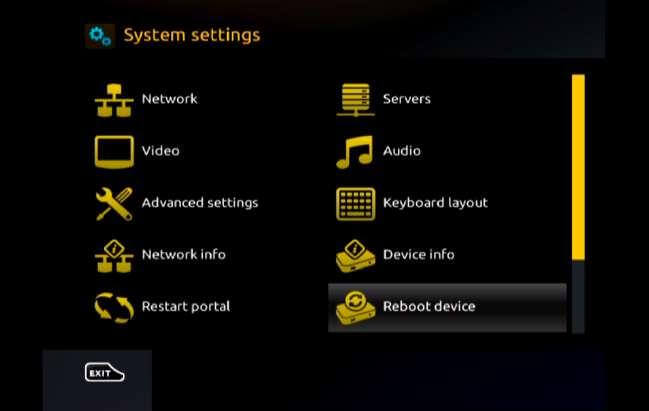
characters. - The box is now all set up. Finally, use your remote to highlight “Reboot device” and click OK. To validate, press OK once more. Your MAG Box can now restart.
- If anything is set up properly, your MAG box can completely boot and load TV service.

To access the on-screen keyboard, press the KB (Keyboard) button on your remote and type the above in.
Use your remote’s arrow keys to find the right keys, then press the OK button to pick each letter or character one at a time.
When you’re done, click the KB (Keyboard) button once more to close the on-screen keyboard.
Finally, click the OK button to save the time server setting on your remote.
Add IPTV Service to MAG Box Portal
Configure Wi-Fi Network on MAG Box
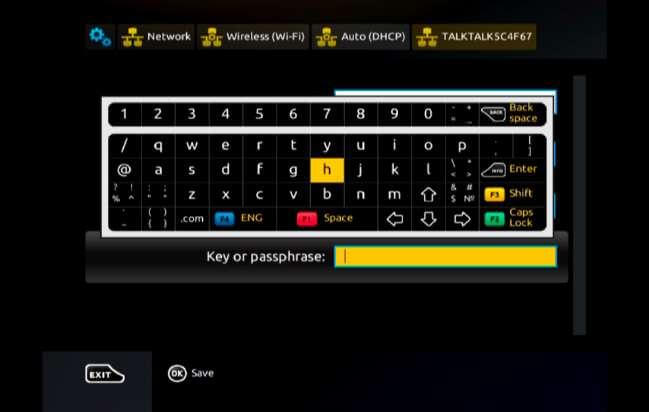
Once you’ve entered your details, press the KB (Keyboard) button again to close the on-screen keyboard. Then, on your remote, click OK to save your password settings.
Your settings should have been “successfully saved,” according to an on-screen confirmation note.
Reload Portal on MAG Box
Unsuccessful?
In certain cases, after hard resetting and formatting your device with the new firmware, your MAG box may not display the “Portals” option under the “Servers” menu, preventing you from entering and storing your chosen “Portal URL” details.
This is occasionally caused by counterfeit boxes that look like real MAG boxes, but are not “flashable” or accept firmware upgrades.
If this is the case, you will need to replace your box with a genuine OEM Infomir MAG box in order to get our streaming TV services.